Overview
Zircon3D supports both x86 and ARM architectures (including Raspberry Pi and other ARM64 systems), and is designed with a strong focus on performance and efficiency, even on low-power hardware.
For the best experience, we currently recommend doing floorplan design and editing on a desktop or laptop computer, where the web-based designer works best with a mouse. Viewing dashboards and 3D models works well on tablets and phones, and we plan to further improve rotation and dragging interactions on mobile devices in future versions.
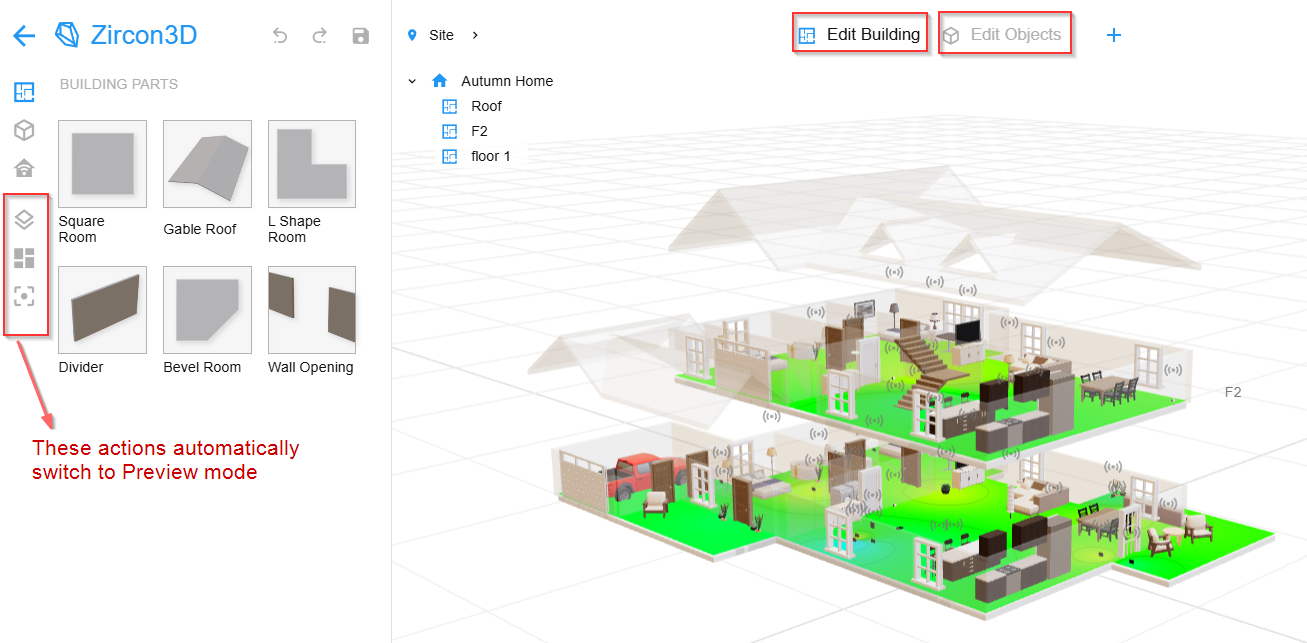
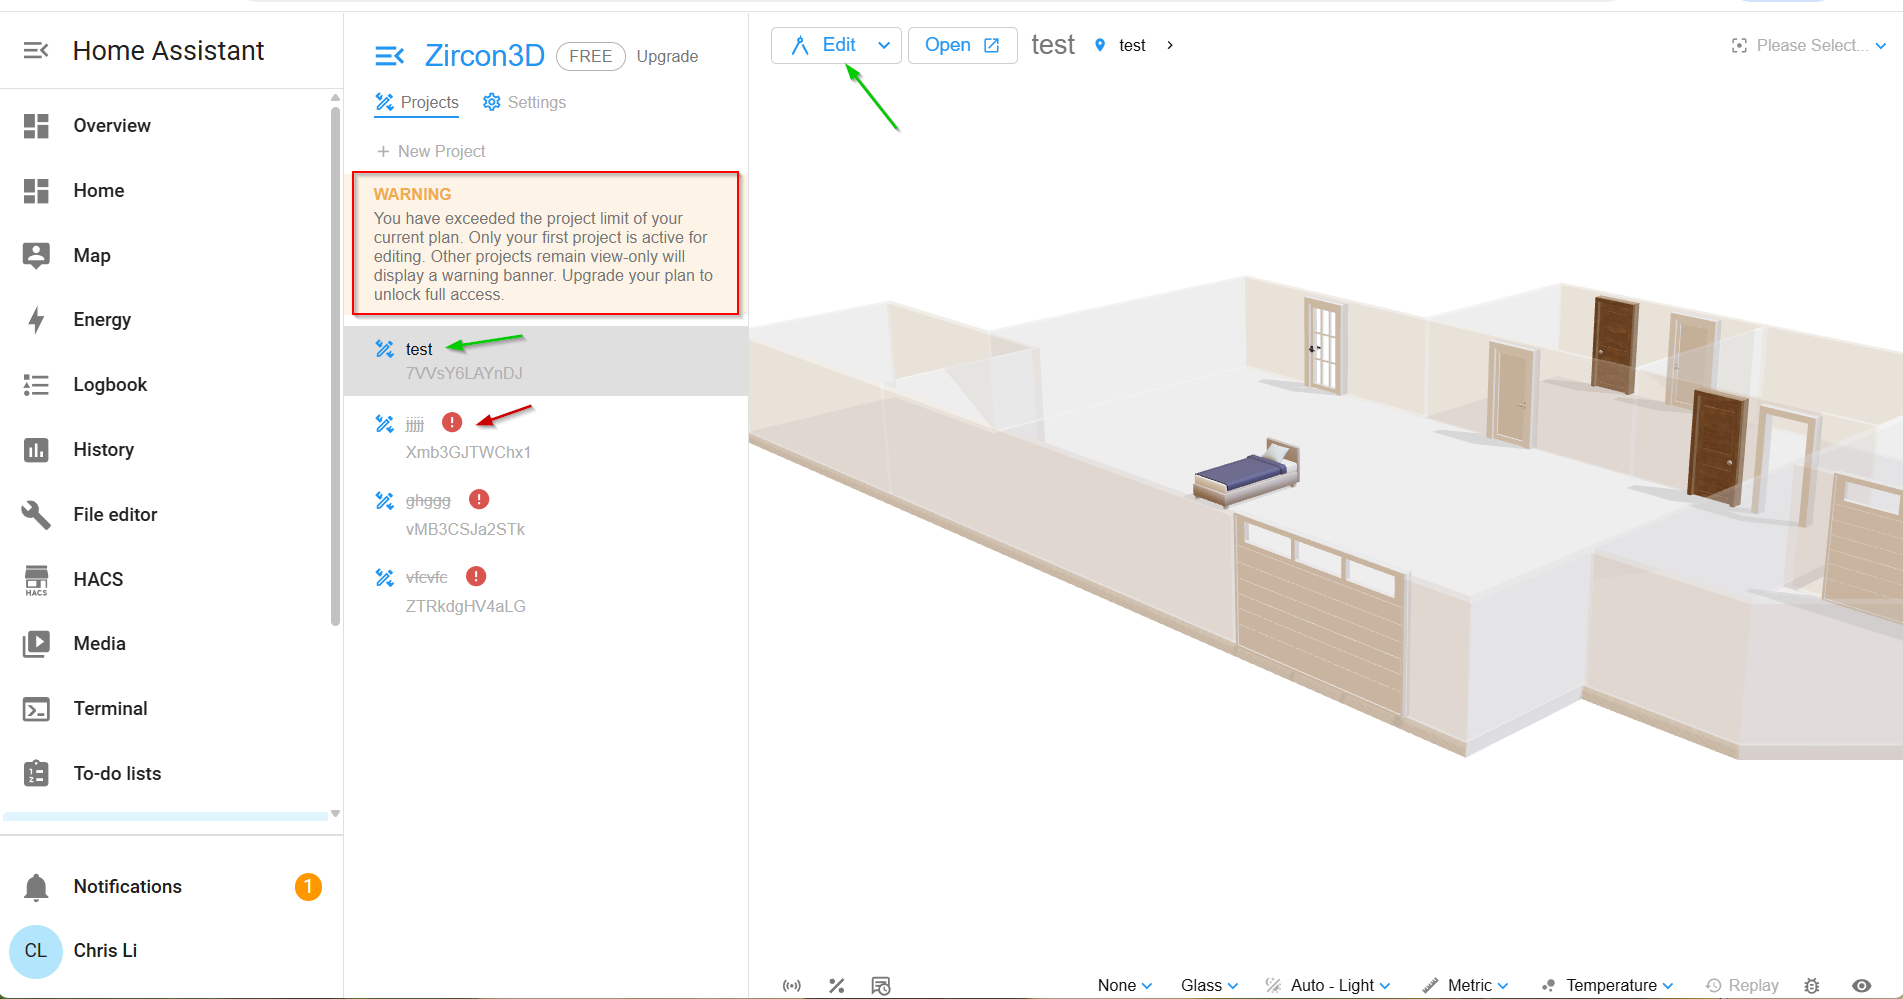
Understanding the Different Modes: Edit Building, Edit Object, and Preview
Edit Building Mode: Add, resize, remove, and modify rooms, floors, and the overall building structure.
Edit Object Mode: Adjust the position of furniture, doors, windows, and smart devices.
Preview Mode: View-only mode with access to the smart device panel for monitoring and control. Thermal images are exclusive to this mode, and the humidity option is available in the bottom status bar.
[image: 1762442186035-894c5a62-fc64-47a2-8bce-0ac88e974a8b-image.png]
Q1. How do I add a building or floorplan?
Q2. Can I import a floorplan image and generate the layout automatically?
Q3. How do I add a door or window to my floorplan?
Q4. How do I add a garage door?
Q5. Can I add an open door or open window?
Q6. Can I add an adjustable stair to my floor?
Q7. How can I add an open space or void to my floor?
Q8. How do I add a deck?
Q9. Can I remove the wall between two rooms, like between the living room and kitchen?
Q10. How can I move furniture to another room so it moves with the room later?
Q11. Can I change the height of the walls?
Q12. Can I change the floor material?
Q13. How many floors or buildings can I create in a project?
Q14. How can I place a lamp on a table?
Q15. Can I change the gap or height between floors?
Q16. How can I remove part of a wall or add a separate wall?
Q1. How do I add a building or floorplan?
Start by creating a new Project and opening the Designer.
Switch to Edit Building mode.
Click the Plus (+) icon to add a building, enter the required details, and begin adding rooms by dragging them from the Building Parts panel on the left.
To add furniture or objects, switch to Edit Objects mode and drag items from the Models panel.
Click Save in the top-right corner or use the shortcut Ctrl+S to save your progress.
In Zircon3D, you can use the location helper to align rooms. Here’s an example: [image: a43939038e7513a18ab3ec690af3d797dd5087c8.gif]
Q2. Can I import a floorplan image and generate the layout automatically?
Not yet. Currently, Zircon3D does not support importing layout images or generating floorplans from images or vacuum data. However, these features are on our roadmap.
Q3. How do I add a door or window to my floorplan?
Switch to Edit Objects mode.
Open the Objects panel on the left and select the Doors or Windows category.
Drag and drop your selected item onto a wall.
Use the Position Helper to adjust its exact placement.
Q4. How do I add a garage door?
In Edit Objects mode, open the Building Parts panel.
Go to the Doors sub-tab.
Select the Garage Door and drag it onto the desired wall.
Q5. Can I add an open door or open window?
Yes.
In Edit Objects mode, open the Objects panel.
Under the Doors category, you’ll find an Open Door option.
Under the Windows category, you’ll find an Open Window option.
Drag either onto a wall as needed.
[image: 1762442681756-aa046527-c9b1-49fd-8181-7bbad22f5b4a-image.png]
[image: 1762734899803-unnamed-4.gif]
Q6. Can I add an adjustable stair to my floor?
Yes, starting from version 1.2, Zircon3D supports adjustable stairs, available for Pro users only.
Before v1.2, stairs were fixed in size like other furniture.
In Edit Objects mode, go to the Objects panel and select the Stairs category.
You’ll find various types of stairs: U-shaped, L-shaped, and straight.
Drag and drop the stair onto your floorplan.
On the right-hand Property Panel, toggle on the Override option to reveal adjustable parameters and material options.
Q7. How can I add an open space or void to my floor?
Add a room to the desired location.
Switch to Edit Building mode and select the room.
In the Property Panel on the right:
Set Fill to None to make it a void.
Set the Interior Border to None if you want to remove the walls as well.
Q8. How do I add a deck?
Add a room where you want the deck.
In the Property Panel on the right:
Set Fill to Exterior.
Set both Exterior Border and Interior Border to None to remove walls and railings.
Q9. Can I remove the wall between two rooms, like between the living room and kitchen?
Refer to Q16. How can I remove part of a wall or add a separate wall?
Q10. How can I move furniture to another room so it moves with the room later?
In Edit Objects mode, select the furniture.
You’ll see Position Helpers appear.
Drag the small blue dot (not the square) to relocate the furniture into another room.
Once placed inside a room, it will stick to that room and move with it if the room’s position changes.
Q11. Can I change the height of the walls?
To change the actual wall height:
Select your Floor from the Explorer panel on the left.
In the Property Panel on the right, adjust the Height field—either scroll with your middle mouse button or input a number directly.
To temporarily change the wall height just for viewing:
Click the Eye icon in the bottom-right Status Bar to open View Settings.
Adjust the Wall Height there.
Note: This change is for viewing only and won’t affect the actual model.
Q12. Can I change the floor material?
Select your Floor node from the Explorer panel.
In the Property Panel, you’ll find a Material selector with various options.
Pro users have access to the full material library.
Q13. How many floors or buildings can I create in a project?
There's no fixed limit on the number of floors or buildings. However, your project quota is based on the total building area, which varies by subscription tier.
Visit our pricing page for the latest details.
For example, Free users are allowed up to 1000 m², 25 monitored devices, and 1 dashboard.
To check your current usage, click the percentage icon in the bottom-left Status Bar to see a detailed quota breakdown.
Q14. How can I place a lamp on a table?
Enter Edit Objects mode.
Select the lamp object.
In the Property Panel, set the Position Type to "Free".
This enables 3-way adjustment handles, allowing you to freely move and rotate the lamp onto the table or other surfaces.
In Zircon3D, the position helper allows movement and rotation along three directions and surfaces. To elevate an object, switch to Edit Object mode, select it, and set its Position Type to ‘Free’ in the right panel. [image: 5382e148adb8b3ace38eb6be1465abc410ae8bd8.gif]
Q15. Can I change the gap or height between floors?
You can adjust the wall height for a permanent change between floors.
For visual-only adjustments:
Open View Settings from the Eye icon in the bottom-right.
Adjust the Floor Separation value.
Note: This setting only affects the current view and won’t be saved to the actual model.
Q16. How can I remove part of a wall or add a separate wall?
To modify or add walls:
Switch to Edit Building mode.
In the left panel, open the Building Parts section.
To remove part of a wall, drag and drop a Wall Opening onto an existing wall. Use the position helper to adjust its size and placement.
To add a separate wall, drag and drop a Divider into the room. You can resize and reposition it using the position helper.
To remove a wall opening, select the parent room of the opening. In the Properties Panel on the right, you’ll see a list of all wall openings associated with that room. Click the “×” next to the one you want to remove.