Which 3D Floorplan Tool Is Right for Home Assistant?
https://youtu.be/DmW2T6G2TiU
For years, many Home Assistant users relied on tools like Sweet Home 3D or traditional CAD software, powerful for drawing, but limited to static images that quickly fall out of sync with a live smart home.
In 2026, the game has changed.
This article compares Zircon3D with Sweet Home 3D and other popular floor-planning tools, and explains why Zircon3D was designed from the ground up for real-time visualization with Home Assistant.
Sweet Home 3D - The “Static Hobbyist” Choice
The workflow
You design your house, render a nice image, then manually place invisible buttons or overlays in Home Assistant.
The problem
Even the smallest change, such as moving a lamp or adjusting a wall, requires re-rendering the entire scene from scratch.
Simple layout tweaks can easily cost 20–30 minutes, turning quick experiments into a slow, frustrating workflow.
What you end up with is a static picture of your home, not a live model that can evolve with your smart system.
Your smart home evolves daily, but your floorplan stays frozen in time.
Zircon3D advantage: Live interactivity
Zircon3D uses a real-time WebGL engine. There’s no exporting and no re-rendering. Move a light, rename a room, or add a sensor and every connected dashboard updates instantly. Your home becomes a living model, not a snapshot.
Floorplanner - The “Cloud Designer”
The workflow
A polished web-based tool with a large furniture library, excellent for interior design and real-estate mockups.
The problem
Floorplanner isn’t built for smart homes:
There is no native integration with Home Assistant, making it difficult to connect real devices or automation data to the floorplan.
Displaying live sensor values typically relies on screenshots, manual updates, or hacky workarounds that quickly become outdated.
The tool has no concept of device state or animation, so lights, fans, and other devices can’t visually reflect their real-time behavior.
It’s a design canvas, not a monitoring system.
Zircon3D advantage: IoT-first DNA
Zircon3D was designed from day one to work with Home Assistant.
That’s why features like:
Thermal heatmaps
Real-time device state animation (fans spin, lights glow, heaters pulse)
Room-aware dashboards
are native concepts—not afterthoughts.
Matterport - The “High-End Pro”
The workflow
Scan your house using a dedicated 360° camera and upload everything to a professional cloud service.
The problem
The overall cost is high, combining specialized scanning hardware with an ongoing subscription fee that can be hard to justify for home or small setups.
All scans and models are stored and processed on external servers, meaning you don’t have direct control over where your data lives or how it’s handled.
For many Home Assistant users, mandatory cloud storage and processing raise privacy concerns and become a deciding factor against adoption.
It looks impressive, but comes with tradeoffs.
Zircon3D advantage: Local-first privacy
Zircon3D delivers a professional 3D experience without forcing your home data into the cloud.
Your floorplan and sensor data stay inside your network, while still offering smooth visuals and real-time interaction.
Other tools you might consider (and why they fall short)
SketchUp - Powerful, but manual, static, and not automation-aware
Planner 5D - Beautiful visuals, but no smart-home integration
Traditional CAD tools - Accurate, but completely disconnected from live data
All are great at drawing. None are great at living with your home.
Why Zircon3D is different
Zircon3D isn’t just a 3D floorplan tool, it’s a visualization layer for Home Assistant.
Real-time 3D (not exported images)
Native Home Assistant integration
Heatmaps, dashboards, and device animations
Local-first by default, cloud-optional
Designed for monitoring, not staging
If you want your floorplan to reflect what your home is doing right now, Zircon3D is built for that job.
Zircon3D - The “Home Assistant–Native” Choice
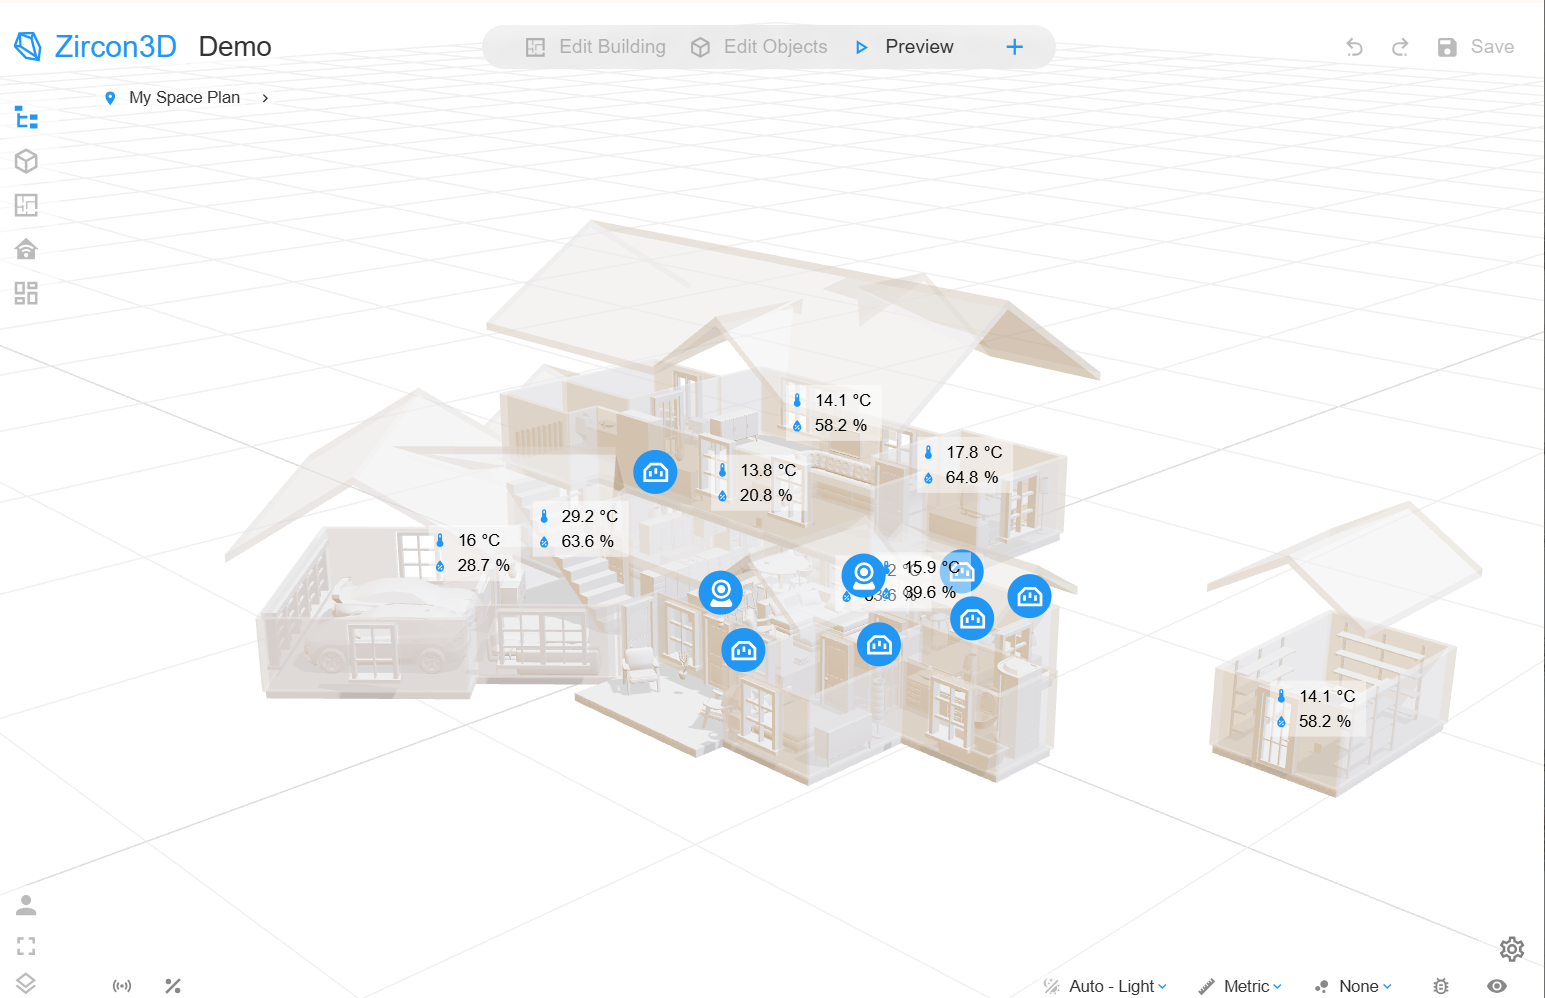
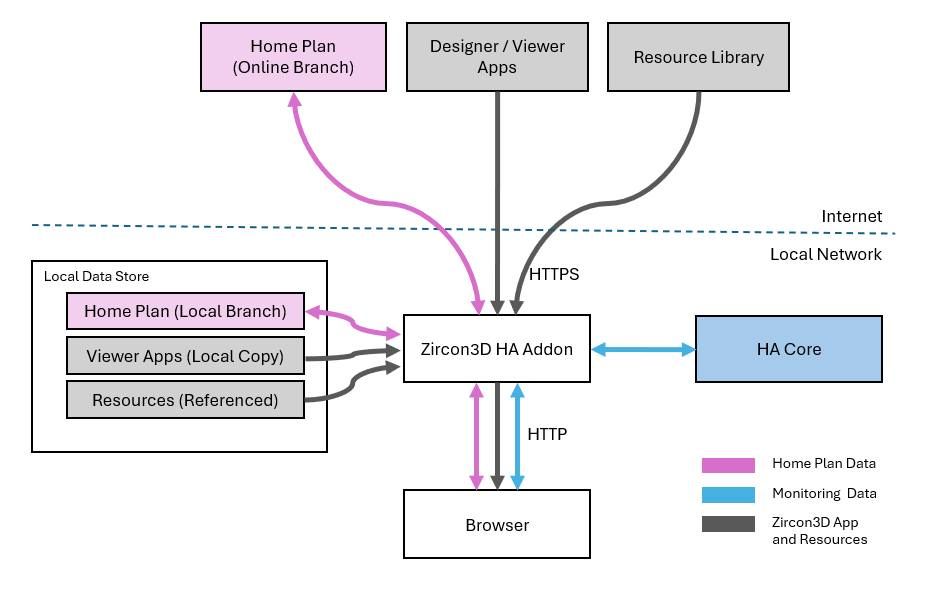
Zircon3D is a 3D visualization system designed specifically for Home Assistant, focusing on real-time interaction rather than static rendering.
It offers a free account to get started, with affordable paid plans that are significantly lower than professional scanning or other design tools, making it practical for both home users and small facilities.
Unlike traditional floor-planning apps, Zircon3D runs as a live WebGL engine, allowing layouts, devices, and sensor data to update instantly without re-exporting or re-rendering. It supports features like room-aware dashboards, heatmaps, and device state visualization, all while keeping performance smooth on everyday hardware.
Most importantly for many Home Assistant users, Zircon3D follows a local-first design by default, keeping your floorplan and sensor data within your own environment, with cloud features remaining optional rather than mandatory.
[image: 1768240845035-30c5f3a0-a3b5-40af-b901-c102001d96d0-image.png]
In short
If your goal is interior design or real-estate visuals, the classic tools still work well.
If your goal is understanding, monitoring, and interacting with your smart home in real time, Zircon3D stands in a category of its own.
Your home isn’t static anymore.
Your floorplan shouldn’t be either.